Tuesday, May 28, 2013

Pad Thai


Pad Thai was actually my first introduction into Thai cuisine.  Although Pad Thai’s humble beginnings can be traced to the street vendors of Thailand, don't let it's origin fool you, its flavor is fresh and complex and rivals any other noodle dishes found in Asia.  Pad Thai truly exemplifies the taste of Southeast Asian cuisine in that it is a perfect balance of salty, sweet, and sour.  It is perhaps the most ordered dish in every Thai restaurant in the west. Here in Oslo, Thai food is quite popular and readymade Pad thai sauce, frozen pad thai, and even pad thai kits could be found at almost every grocery.  However these readymade sauces are nothing short of a disappointment.

I never did understand why people even bother buying these as it is relatively quite easy making pad thai from scratch.  The ingredients in pad thai after all are tamarind paste, fish sauce, and sugar. Most of the ingredients can be found in Oslo’s “innvandrerbutikker” or literally “foreign shops.”  Tamarind paste is the source of its sour taste combined with the saltiness of fish sauce and the sweetness of sugar.  The traditional recipe calls for palm sugar, but living in Norway and living quite a distance from the center of Oslo, I find brown sugar is a good substitute.  Pad 
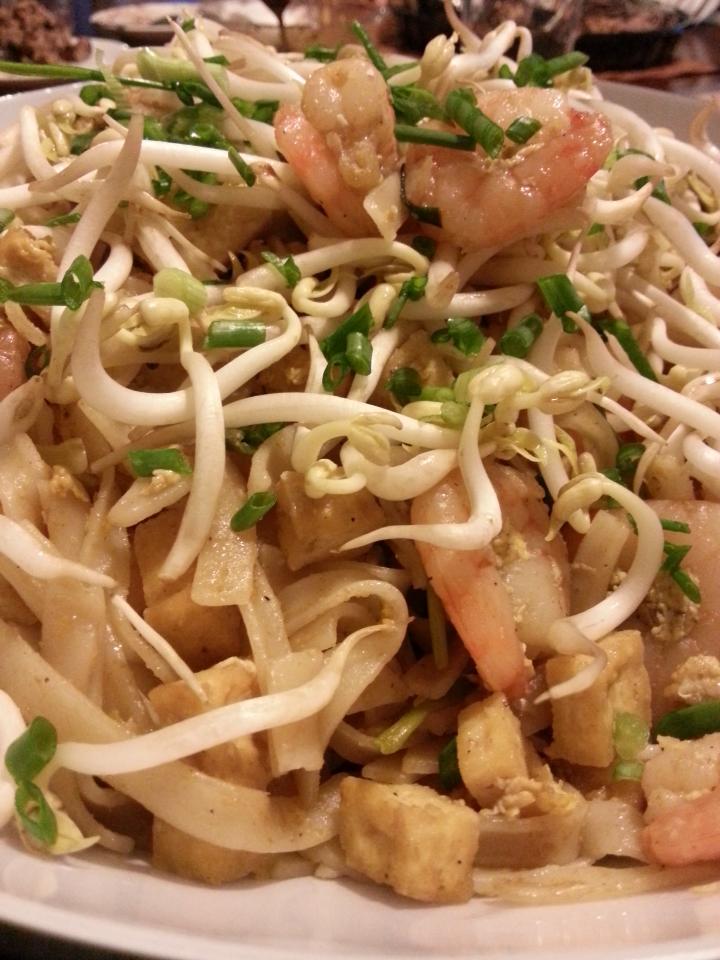
thai also consists of prawns and/or chicken, eggs, flat rice noodles, and spring onions.  Additional ingredients such as fresh bean sprouts, coriander leaves (cilantro for my US followers), additional sugar, and lime can be served and added when plating.  For an extra crunch I also like to add fried tofu cubes.

 Although the ingredients may seem to be quite a lot and also may seem quite hard to make, it is actually quite simple.  Some tips when making pad thai is to prepare the sauce in advance.  To get the right balance, it is good to start off with 1:1:1 portion to balance the salt, sweet, and sour.   Although in this recipe I will give approximate measurements, as a general rule, always go by your own taste and preferences.  Another tip is not to overcook the rice noodles and to follow the instructions on the package.  I soak my noodles in hot water for at least 6-8 minutes.  The noodles should be relatively al-dente in order to avoid mushy noodles. 

With all these in mind, the result will be beautifully dry brownish noodles that are perfectly balance in flavors.  So enjoy!


Ingredients
·         ⅓ cup fish sauce

·         ½ cup palm sugar

·         ½ cup tamarind juice concentrate

·         4 cloves garlic, minced

·         1 pack of dry rice noodles

·         4 cloves garlic, minced

·         1 ½ cups thinly sliced chicken

·         1 ½ cups of prawns

·         1 cup of tofu small cubes

·         2 eggs

·         1 bunch green onions cut into 1inch sections

·         1 packet of mung bean sprouts (reserve half for garnish)

·         1 bunch of coriander/cilantro (garnish)

·         Toasted peanuts chopped (garnish)

·         Lime wedge (garnish)

·         Dried chili flakes (optional)

Instructions:

1.       Prepare pad thai sauce by mixing fish sauce, brown sugar, and tamarind concentrate. Stir sauce well to fully dissolve brown sugar.  Test the sauce to your preference and adjust accordingly.

2.       Soak noodles for 6-8 minutes in boiled water (but not over the heating plate) and drain immediately rinsing with cold water for a few seconds.  Again, make sure the noodles are al-dente and not over soft.

3.       Pre fry tofu cubes in hot oil till golden brown and crunchy.  Set aside.

4.       Heat 3 tablespoons of oil in a wok or frying pan on high and cook raw chicken and/or shrimp for 3-4 minutes. Remove meat/seafood into a small bowl.

5.       Heat the remaining oil and then add garlic to the wok and stir fry for 1 minute stirring the garlic mixture so it will not burn. Add noodles and stir for 1 minute. Slowly add at least half of the Pad Thai sauce stirring noodle mixture until well coated with sauce.

6.       Add cooked meat/tofu/seafood back and fry for 2-3 minutes. Move the noodle and remaining ingredients to the sides of the wok.  Add more oil to the wok and crack an egg then scramble the egg till fully cooked.

7.       Add remaining sauce, spring onions, and sprouts and cook for one more minute or till noodles are no longer hard.

8.       Plate noodles and garnish with chili flakes, cilantro, remaining bean sprouts, lime wedges, and sugar.

Saturday, April 6, 2013

Sichuan Inspired Hot Wings


Today I am presenting my version of hot wings.  This recipe is a Sichuan inspired dish in that I will be using chili bean paste or dou ban jiang.  Many Sichuan dishes contains dou ban jiang as a major ingredient and is considered the soul of Sichuan cooking.  

I am a big fan of hot wings and often make the standard buffalo wings with Louisiana hot sauce. Several months ago, I was in the mood for hot wings but did not have any Louisiana hot sauce to use. I did, however, have some dou ban jiang in the fridge (this is a staple sauce in my household ). Desperate for hot wings, I decided to replace the Louisana hot sauce with dou ban jiang and also used typical Asian ingredients for this new recipe.

The chicken wings were lightly coated with seasoned flour (flour and salt) and set aside to rest for at least half an hour.  This way the natural juices of the chicken combines with the seasoned flour to form a sticky coating that becomes crispy when fried.  I used honey and sugar to have add sweetness to compliment the spice and also to ensure the sauce would stick to the crispy skin.  Vinegar was added for a tangy flavor which also lends well to the sweetness. .

The result was delicious!  These wings are a balance of spice, sour, sweet, and salty.  In addition to the wings remaining crispy, the sauce was sticky and finger licking good!

Here is my Sichuan inspired hot wings and I hope that you enjoy these wings as much as I have!

Ingredients:

24 pcs chicken wings
Flour
Salt
2-3T Chili bean paste (you can add more or less depending on your tolerance)
3T Chinkiang vinegar
1T  Dark Soy Sauce
1 and 1/2 T Light Soy
2T Honey
4T sugar (you can adjust according to your taste)
1T Sesame seed oil
2 cloves of minced garlic
1 inch knob minced ginger
Cornstarch slurry (2T water + 1t cornstarch)
Toasted sesame seed for garnish
Oil for deep frying

Instructions:
1.  In a plastic bag, combine flour with salt (add salt according to your taste) and lightly flour wings.  Set aside on a plate for at least 1/2 hour.
2.  Pour oil in frying pan or deep fryer and heat to about 175C.
3.  Fry chicken till in hot oil till golden brown.  Set aside. (to have extra crispy, I recommend to double fry the chicken)
4.  In a wok, add 2T cooking oil and heat wok till it begins to lighlty smoke.
5.  Add garlic and stiry fry till it is fragrant.
6. Add Chili bean paste, soy sauce, vinegar, and honey.  Allow for sauce to cook for at least about a minute.
7.  Add water and cornstarch slurry to help thicken sauce.
8.  Stir in sesame seed oil and immediately add chicken wings to sauce.  Toss the wings till sauce coats the wings and immediatly serve on a plate.
9.  Garnish wings with toasted sesame seeds and serve hot.

Note:
1.  Always go with your personal taste and adjust measurements accordingly.
2.  I like to add dried chilies to my sauce to make the wings even spicier.
3.  Wings can be substituted with crispy pork or chicken breast strips.

Thursday, March 28, 2013

Sichuan Wontons in Red Chili Oil and Black Vinegar Sauce


Early this week, the wife and kids were in the mood for dumplings .  We began to weigh the pros and cons of eating out for dim-sum or perhaps making dumplings at home.  I had a hard time justifying paying  kr 60,- (approximately $12.00 to my peeps Stateside) for 3 pieces of siu mai from a restaurant in Oslo.  So we opted to go home and make wontons instead.

I decided to make Sichuan style wontons in red chili oil and Chinese black vinegar.  These are always a big hit and one can never make too much wontons.  Wontons are often associated with Cantonese dimsum, but each region has their own way of making wontons. 

Sichuan Red Chili Oil Wontons are really quite easy to make and can involve the whole family in wrapping each wonton.  I enjoy making these wontons with my family and we often use this time to not only eat fantastic wontons, but also to have quality with one another. 

The wonton filling is based from the Cantonese method, by  including minced pork and shrimp to ensure the filling to bind and to have a compact and dense texture.  The shrimps also add extra flavor to the pork and really give it more complex flavor. So enjoy these wontons and share with your friends and love ones.


Time
Prep: Approx. 1 hour
Cooking tie 10-15 minutes total


Ingredients

Filling:
250 grams minced pork
250 grams minced prawns
2-3T Sesame seed oil
2T soy sauce
1 stock chopped green onions (green portion)
Salt and pepper to taste

Sauce:
1/4 cup soy sauce
5T Chinkiang Black Vinegar
3T Red Chili Oil
1T Sesame seed oil
1t crushed Sichuan pepper corn
2 stocks chopped green onions (greens only)
Fried garlic
pinch of sugar to bring together the flavors
30-40 wonton wrappers
Instructions:
1.  Combine minced pork, minced shrimp, sesame seed oil, soy sauce, chopped green onions, salt and pepper thoroughly.  Set aside and marinate for at least 30 minutes
2.  Fill wonton wrappers with 1tablespoon of the meat mixtures.  When wrapping, place meat in the middle of the wrapper.  Moisten the two sides of the wrapper and fold wrapper in half (think  of the wrapper has a diamond and folding into a triangle).   Moisten the two bottom edges of the wrappers and press the two corners together.
3.  Place wontons in boiling water (season water with salt or use chicken stock for extra flavor).  Boil the wontons till they begin to float (approx. 5 minutes).
4.  Prepare red chili oil and vinegar sauce by combining all the ingredients, with the exception of the fried garlic and chopped green onions.  Mix well.
5.  Place wontons on a large serving bowl.  Pour red chili oil and vinegar sauce mixture over wontons. 
6.  Garnish dish with chopped green onions and fried garlic
7.  For extra flavor, I like to add "Lao Gan Ma" brand chili sauce in oil.  

Enjoy!

---The Frustrate Fil-Am Chef

Saturday, March 23, 2013

Zha Jian Mian Noodles


Zha jiang mian is a famous noodle dish that originates from Northern China and is quite popular in Beijing.  Zha Jiang literally means "fried sauce" and can be considered as the pasta bolognese of China.  It is often served on top of la mian noodles, with condiments of thinly slices cucumber and carrots.  Below is a recipe of my version of Zha Jiang Mian.

Ingredients:
500g of ground chicken
1/2 cup sweet bean paste
1T black beans
1-2 cups of water
4 minced garlic cloves
4 spring onions chopped (white portion onlyI
3T Soy Sauce
Splash of dry sherry
1T Sichuan pepper corns
3 star anise
Oil
La Mian noodles or store bought Beijing noodles
Thinly sliced cucumber and carrots

  1. Add oil and heat wok at high heat.
  2. Add sichuan pepper corns and star anise and fry till fragrant.  Discard pepper corns and star anise from oil.
  3. Add minced garlic and spring onions.  Stir fry till fragrant.  Place black beans and continue to stir fry for a minute.
  4. Add ground meat and stir fry till no longer pink.
  5. Add dry sherry, soy sauce, sweet bean paste and continue to stir fry for 3 minutes or so.  Add water and cook till sauce reduce.  If sauce is still not thick enough, corn starch solution can be added to help thicken the sauce. 
  6. Once sauce is thicken, turn off heat and serve meat sauce over noodles.
  7. Additional condiments of cucumber and carrot slices can be added to top the dish off.

Handmade Noodles: First Attempt


For anybody who trully knows me, they would know I am a sucker for noodles.  Whether it is of  Thai, Filipino, Vietnamese or Chinese in origin, I love noodles! Through the years, I have been able to reproduce all my favorite noodle dishes, however, never have I tried to make my own handmade noodles...until today.

I decided to have a go at making Chinese "la mian" or hand pulled noodles.  As the name implies, the noodles are made and pulled by hand without the aid of a machine.   It takes a tremendous amount of skill to make noodles all by hand, and even years of hard work and dedication to this skill.  That is why la mian masters are held in high esteem for their abilities to make noodles.  I remember watching a tv show some years back and seeing how easily a la mian master would make noodles.  It looks so easy that many believe they can do the same and I being one of them!

Two weeks ago, I began the process to research the whole process in making la mian noodles.  I watch youtube videos of masters at work, studying their techniques and taking notes on their methods.  I read recipes and also forums where amateur chefs, such as myself, shared their experience making la mian.  Many had commented that making the la mian dough was extremely difficult to reproduce.

However through my research I found that all can agree that high gluten flour is part of the key to a successful dough.  The gluten content of the the flour had to be able to create a dough that can be easily stretched when pulling and dividing the noodles.  The second key is the kneeding process.  The dough must be kneeded for at least 15 minutes to work the gluten and to create a dough that is soft, flexible, and workable.  The third is technique in stretching the dough, dividing and pulling the dough to make noodles.

Today I gave the process a try.  I am no stranger to handling dough and felt fairly confident in my ability to learn new things.  I began the process by combining 3 cups of high gluten flour with 1T salt and 220ml of warm water.  Once I formed a ball of dough I began kneeding the dough for 15 minutes.  After kneeding, I sat the dough aside to rest for 1 hour. I tested the texture of the dough and it seemed to be the right texture.

I began pulling and stretching the dough and noticed that although the dough was soft and pliable, it was still quite stiff and I was not able to pull the dough without it breaking. As you can imagine I was quite disappointed by my inabiltiy to pull of the process.  I then opted to roll out the dough and cut noodles instead.  After cutting the dough, I placed the noodles in a pot of boiling water and cooked it quickly.  To my surprise the noodles still came out tasting better than the store bought noodles I would buy at Asian groceries!

I did end up using the noodles to make Zha Jiang Mian (click here to go to recipe).

As the title of my blog implies, this was my first attempt and although I did not pull off the process of making la mian, it would not be my last.  I will continue to blog about my attempts to perfect this art of making hand pulled noodles.


Sunday, March 17, 2013

Thai Style Crab Cake Sandwich with Chili Mayo

When I first moved to Norway 10 years ago, the only fast food joints were American burger franchises, pizza franchises, and kebab fast food restaurants.  These places never caught my fancy, however they were the only options we had 10 years ago.  Things have changes since then and fast food has become some what of a fad in Oslo.  But this fad  comes with a price...and extremely high one! For my American readers, can you imagine paying $20 dollars for a burger?   What happened to catering to the masses?

However there are a few affordble gems in Oslo. The Vietnamese Bahn Mi sandwiches can be found in many Vietnamese restaurants in Oslo.  Bahn mi sandwiches are a combination  marintated beef, pickled vegetables that is served on a French baguette.  The Vietnamese were the originators of fusion cuisine and the bahn mi sandwiches are a pefect example of this. What makes these sandwiches great is the balance of sweet, salty, spicy, and crunchy and not to mention at a affordable (by Norwegian standards) price.

Tonight's dinner was inspired by this fusion of East and West fast food style, Thai Crab Cakes served in a Ciabatta bun, with pickled carrots and a chili mayo sauce. Below is my recipe for my  Thai crab cakes and should yield 4-6 servings.  Enjoy!

Ingredients:
12 oz canned crab meet
2 cups panko bread crumbs
2 eggs
Vietnamese seasoned fish sauce (Nuoc Cham)
Half inch knob of Galanga
1-2 red chili
1 lemon grass stem
3 kefir lime leaves
Lime juice
Shredded carrots
Lettuce
Mayo
Siracha hot sauce
Oil for frying
4 ciabatta buns

Preparation:
  1. Grate carrots and allow to marinate in seasoned fish sauce (1.5 cup fish sauce, 1 cup water, 1/4 cup sugar, juice from 1 lime, 4 cloves garlic minced, and 2 chilies chopped)
  2. In a food processor, combine the red chilies, galanga, lemon grass, kefir lime leaves, juice from half a lime, 6T of seasoned fish sauce. Blitz till the ingredients turn into a red paste.
  3. Add crab meat, 1 and 1/4 cup panko (save the remaining 3/4 for dredging), and 1 egg.  Blitz till the all the ingredients are combined.
  4. Form the crab mixture to 4 large patties and dip each patty in egg and dredge in panko.
  5. Fry each patty for 2-3 minutes on each side on medium heat, or till they turn golden brown.
  6. For the chili mayo, combine 4T of mayo, 1-2 T Siracha hot sauce (could be more or less depending on your tolerance), 2T seasoned fish sauce and mix well.
  7. Serve crab cakes in a ciabatta bun with pickled carrots, lettuce, and topped with chili mayo.
---The Frustrated Fil-Am Chef

Saturday, March 16, 2013

Lomi Lomi Salmon Tacos


Tonight is taco night in the household of the Frustrated Fil-Am Chef.  My children made a request for tacos, but one problem...I am not a big fan of supermarket tacos.  I made standard Old El-Paso tacos for my children, but my wife and I wanted something different.

For the past couple of days, I have been wanting to make lomi lomi salmon, a Hawaiian version of ceviche. Lomi Lomi means to massage with hands.  Fresh salmon is salted overnight and mixed with tomatoes and onions and as the name implies mixed with the hands.  The mixture of salt, onion, and tomatoes cooks the salmon through oxidation rather than using heat.

I then came up with the crazy idea of combining Hawaiian lomi lomi salmon with tacos. Afterall, pico de gallo contains essentially the same ingredients found in lomi lomi salmon, minus the salmon.  Fish tacos is also a standard in American tex-mex cuisine...so why not combine the two?

I have modified the lomi lomi salmon recipe to include fresh lime juice, chopped chilies, and corriander to simulate the pico de gallo taste.  Instead of using stale store bought taco shells, I fried soft flour tortillas to make crunchy taco shells, which I found to be much better and tastier.  To top it off I made home made guacamole.  The combination of the salty and sour lomi lomi salmon, creamy guacamole, and crunchy shell made this a match made in heaven.  It will definitely be on our menu again in the near future.

Ingredients

Lomi Lomi Salmon:
400g salmon loin
4 tomatoes chopped
1 medium sized onion chopped
1 lime juiced
Chopped corriander
Salt

Guacamole:
2 Avocados
1/2 onion
1/2 tomato
1 bunch corriander
1/2 lime juiced
Sea salt (to taste)

Flour torilla
Oil


  1. Salt the salmon loin thoroughly and let stand from 1 hour to 1 day.
  2. Cut salmon in small chunks and place in bowl.
  3. Combine salmon with chopped tomatoes, chopped onion, lime juice, chopped corriander, and chilies.
  4. Mix thoroughly with hands and allow for ingrediant to settle.
  5. With a fork, make several punctures all over the tortillas.
  6. Heat pan with enough oil to fry tortillas. Fold tortilla and fry one side of torilla in oil and using a tong to hold the other side of the tortilla to maintain shape.  Once golden brown, flip tortilla and repeat.  Set aside and allow to cool.
  7. In a food processor, add avocados, onion, tomato lime juice, corriander, lime juice, and sea salt.  Blend for several second, just enough to break down the ingredients.  Make sure not to blend to long as guacamole should be chunky.
  8. Assemble tacos by adding lomi lomi salmon and topped off with guacamle sauce.  Garnish with chopped chilies and garnish with fresh greens.
---The Frustrated Fil-Am Chef


Thursday, March 14, 2013

Stir-Fry Pork with String Beans and Black Beans


Fermented black beans are a widely used ingredient found in Asian cuisine.  Unlike other forms of beans, fermented black beans is used as seasoning and used in small portions due to the saltiness of the beans.  In addition to being salty, the taste can be described as pungent, sharp, sweet and bitter.  It can be used to make sauces, steamed with fish, and also for stir fry dishes.  But when using, it is always wise to remember that a little goes a long way.

Today for our family dinner, I made Stir Fry Pork with Green Beans and Black Beans.  It is a very fast and simple dish to make.   After a long day from work and coming home late from church, I wanted to make dinner that was not too much of a hassle to prepare.

For a little kick, I like to add some julienne chilies to compliment the saltiness of the black beans.  The black beans add more depth and complex flavors rather than relying on soy sauce or using oyster sauce.  In addition, I find the combination of garlic and black beans to be a match made in heaven.  I love black beans with pork, but black beans can also be used for seafood as well.

Preparation time : 30 min
Cooking time 15 min

Ingredients:
500g pork shoulder thinly sliced
Hand full of string beans cut in half
3T fermented black beans
2T Soy Sauce
2T Mirin
1T Dark soy sauce (for color)
Water
4 cloves of garlic
Chopped spring onions
2 chilies julienned
Several drops of sesame seed oil
Corn starch

1.        Marinate pork with splash of soy sauce and about 1T corn starch for 30 min.

2.       Heat enough oil in wok to cover pork and deep fry til no longer pink.  Set aside pork.

3.       Drain oil from wok and leave about 1-2 T of oil for stir frying.

4.       Add garlic and stir fry till fragrant.  Immediately add black beans and stir fry for about 2 minutes.

5.       Return pork to work and add soy sauce, mirin, and water to help balance the saltiness of the black beans. 

6.       Add string beans to the wok and stir fry for 2-3 minutes. 

7.       Add corn starch solution (1t corn starch to 3T water) til sauce thickens and immediately plate the dish.

8.       Drizzle sesame seed oil on dish.  Garnish with red chilies and spring onions before serving.

Sunday, March 10, 2013

Stir Fried Morning Glory with Pork in Oyster Sauce

I have been blogging now for only two days and already I have started to receive requests on other recipes.  Although I originally planned to write blogs on the weekend, I could not say no to a special request from a very close friend of mine who so happens to also follow my blog.  So today I would like to share a favorite in the household of The Frustrated Fil-Am Chef, Stir Fried Morning Glory with Pork in Oyster Sauce.

Morning glory is a green leaf vegetable that is widely used in Southeast Asian cooking. To my fellow kababayan from the Philippines, morning glory is known as kang-kung and is often used in dishes such as sinigang (tamarind broth soup), adobo, and is even battered and deep fried.  However , stir frying morning glory is not a common method in the Philippines.

The recipe I am presenting today is a Thai inspired recipe, with very strong influence from Chinese cuisine.  I have also added thinly sliced pork to add a source of protein to the recipe.  The ingredients in preparing my morning glory recipe is very short, making it simple to make for those who are on the run.  A couple of tips should be observed when cooking any stir fried dishes:

1.       Use a properly seasoned wok that has been well oiled.

2.       Stir fry using high heat to add the element of "wok hei" or the breath of the wok to add depth and flavor that is common in Asian cooking.

3.       Do not overcook the vegetables.  Stir frying should be fast to lock the flavor of the vegetable.

As this is a Thai inspired recipe, I often use bird-eye chilies for a good amount of heat to give the morning glory an added kick to the taste buds (this can be taken out if you prefer a milder version) .

Stir Fried Morning Glory and Pork in Oyster Sauce

2 Packages of  Morning glory chopped 2 inches in length
200g Thinly sliced pork
4 Cloves of garlic minced
3-5 chopped bird eye chilies (optional)
2-3T Oyster Sauce
1T Fish sauce
1t sugar
1/4 cup of water
Egg white
1T Soy Sauce
1T Corn starch
Oil
1. Combine sliced pork with egg white, soy sauce, and corn starch solution and marinate for at least 30 minutes.
2. Heat wok with oil (enough to cover meat) and fry pork til golden brown.  Set aside.

3.   Reduce oil to 2T and heat wok at high till the it begins to smoke.  Add chopped morning glory to the wok and stir fry. 
4:  Add garlic, chopped chilies, oyster sauce, fish sauce.  Slowly add the water till you reach desired taste and add sugar. 

5.  Immediately add pork to the dish and stir fry for a couple of minutes and serve.

---The Frustrated Fil-Am Chef

Yu xiang qie zhi (Fish Fragrant Eggplant)


From my youth, I have always loved Chinese cuisine.  As I have mentioned earlier, growing up in Anchorage, Alaska, my Saturday morning line up would consist of cartoons and the cooking show  "Yan Can Cook."  It was actually this show that would spark my interest in Chinese culinary arts.  I was also exposed to traditional Chinese cuisine by my martial arts instructor via the local Chinese community.  It was through my connections in the Chinese community both in Anchorage I  would discover that Chinese cuisine was not the typical Mongolian Beef or Chop Suey dribble that is all too common in Chinese restaurants in the western world.


One particular style of cooking that captured my attention, and perhaps my favorite style of cooking is the Sichuan cuisine of Western China.  It is among the major regional cuisines found in China.  This style of cooking is notorious for it liberal use of garlic and various types of chilies. Whether these chilies are fresh, dried, pickled etc, the heat and flavors are all a major influence in Sichuan style cuisine.  Another major ingredient that is widely use in Sichuan cuisine is the use of the tongue numbing hua jiao, or better known as the Sichuan pepper corn.  

Among my favorite dishes is a dish I actually first tried in Anchorage, called Yu Xiang Qie Zhi (fish fragrant Eggplant) .  No, the dish does not smell like fish, and unfortunately the English translation of this dish does not do the dish justice.  The "fish fragrant" connotation refers to the use of seasonings that produce a combination of sour, hot, sweet, and salty flavors that is often associated to fish dishes of the region. 
Yu xiang qie zhi can also be prepared with or without ground pork, depending on your preference.  However the star of this dish are the eggplants and "fish fragrant" sauce.

Yu Xian Qie Zhi Recipe:
4-6 eggplants
250g ground pork (I prefer to use thinly shredded pork)
4-6 chilies (depending on how spicy you like it)
2-3 T chili bean paste
2T light soy sauce
2 T chinkiang vinegar
1T dry sherry

1-2cup chicken broth
1t sugar
1t minced ginger
1 clove of minced garlic
Chopped leaks
Cornflour solution

1. Cut eggplants into short strips (about the same size as steak fries) with the skin on.
2. In a wok, heat enough oil to deep fry the eggplants til golden brown (approx 3-4 minutes).  Set aside and drain from oil.
3.  Pour off excess oil from the work and leave about 1-2 T in the wok.  Add minced garlic, ginger, white portion of leaks, and chilies.  Stir fry at high heat till fragrant.
4.  Add ground pork and stiry fry till it is no longer pink.
5.  Add all the remaining ingredients and allow to boil.
6. Add the fried eggplants to the wok and stir fry for several seconds.  To thicken the sauce, add corn starch solution and stir to ensure there are no lumps in the sauce. 
7.  Remove from wok and when serving garnish with chopped spring onions and drizzle some sesame oil on the top. 

Enjoy!

---The Frustrated Fil-Am Chef

Saturday, March 9, 2013

A bit about myself

The Frustrated Fil-Am Chef

I am a Fil-Am expat who has been living in Oslo, Norway since 2002.  You may wonder why have I decided to call my blog "The Frustrated Fil-Am Chef"?  I am not really a chef, more like a chef at heart.  I am actually a payroll consultant for one of Norway's largest Payroll and Outsourcing firms. Although I am heavily involved in my career, cooking has always been my passion. 

The passion for cooking started from my youth. I have fond memories of my mother performing wonders in the kitchen in regards to our native Filipino cuisine. In addition, our family was quite adventurous when it came to trying new restaurants and cuisine.  

While growing up in Anchorage, Alaska, in addition to the saturday morning cartoon line-up, I would watch religiously Martin Yan's show "Yan Can Cook."  The expertises of Mr. Yan's cooking method trully captured my attention and till this day I still follow his advice from his tv-program.

During my teens I would read my parent's collection of cook books and try my hand recreating the dishes, with my younger sister as my taste tester and critic.  I had my share of failures and successes, but even since my youth, I found cooking as a source of therapy.

In addition to my love for cooking.  I am an avid practitioner of Chinese martial arts.  Like martial arts, cooking requires to follow a set recipe and later mastering the basics to eventually forget everything you have learned to create something that is "yours."  There are many correlations between cooking and martial arts such as perfection of techniques and the amount of work behind to one's skill to achieve "gong-fu."

My connections in Chinese martial arts and with the local Chinese community also opened my taste buds to "authentic" and traditional Chinese cuisine.  I learned that Chinese cuisine have many regional styles such as the fiery and flavorful Sichuan cuisine, to the wonderful "heart-delight" of Cantonese cooking.  But growing up in the Alaska, there wasn't really a need to cook since I consider my mom a excellent cook. Not to mention our family had our list of exceptional restaurants we would frequent on occasions.


It was not until I moved to Norway, my real passion for cooking would begin to re-surface.  Norway 10 years ago did not have much in regards to Asian cuisine.  You had the typical Chop suey Chinese restaurants serving the typical fair of "Western" influenced Asian cuisine.  To my disappointment, I found the Asian cuisine in Norway to be bland and overly watered down.

My taste buds longed for the classic and traditional dishes I grew up eating.  I began to recreate my favorite dishes I grew up with by memory.  In addition, I began to research various cooking styles of Asia and started to to explore European, American, and Middle Eastern cuisine. Having friends in Norway who are professional chefs or work in the food industry has also helped me to grow and expand my taste pallet.
I have tried to make a career out of my passion by starting a business delivering my own version of cinnamon rolls to local cafes.  It went well at first and I had small following in Oslo.  However due to tough competition from larger and cheaper bakeries, and the fact I hardly had time with my family, I decided to return to a regular 8-4 job. Although my heart was in cooking, it could not support the needs of my family, thus why I have chosen the name "The Frustrated Fil-Am Chef."  I may not be a trained chef, but I enjoy creating dishes and aim towards perfection everytime I cook.

This blog is a reflection of my experience cooking the dishes and cuisines I hold very dearly to my heart. Cooking for me is a form of meditation and art. It takes time effort, hard work and love to achieve something that can be presented and enjoyed to those we love.I hope through this blog I may share my love and joy of cooking with others.

Enjoy!

---The Frustrated Fil-Am Chef 

10 year wedding anniversary dinner

 I figure a good way to start this blog off is to share with my viewers a very special occasion in my life.  March 8, 2013, my lovely wife and I celebrated our 10 years of marriage.  My wife and I met back in college in the Philippines and we started pretty much as friends.  As time passed our friendship developed to love. 

10 years ago, I moved to Norway to follow my wife.  I gave up my career in marketing in Alaska to be with my then fiance in Norway.  Being young and naive, I thought it would only take me tops 3 months to find work.  Being that I was an Fil-Am starting a new life in Norway, it was quite difficult to find work in marketing. So those three months became 3 years!

Our first year anniversary was spent at the hospital when she was confined due to a complication in the pregnancy with our daughter.  To try to salvage our anniversary, I made a very simple pasta dish with pesto (from the bottle) with some shrimps I found in my in-law's fridge.  When I arrived at the hospital with our dinner, I remember the joy it brought to my wife that despite our circumstances, we still manage to make our anniversary a memorable one.

A lot has happen since then. Our marriage spawn two wonderful children (a 9 year old girl and a 3 year old boy). I now have a successful career in payroll.  And most of all the love my wife and I have continued to grow through the years.

Being our 10 year anniversary, it had to be special and memorable.  Since January, I carefully planned out our menu, the arrangements, and most especially the babysitter !  A restaurant was out of the question as most restaurants we frequent during our anniversaries have always been a let down.

Dinner had to be easy to prepare, yet have a sense of class for the occasion.  Our menu for this night was Shrimp cocktail, braised beef rib in red wine and cider sauce, mash potatoe and chives, a side of asparagus, and tiramisu.

The dinner was a success and our 10 year anniversary celebration was a night to remember with good food, perfect ambiance, and the company of the woman I love the most.  At the end of the dinner, I had a surprise for my wife.  I presented her a new wedding band upgraded with diamonds, and afterwards I knelt down to renew my vows to her. 

Below are the recipes for our Anniversary dinner.  Please bare with my lack of details in regards to the cooking instruction (I never use measurements and go strictly with taste and technique). Enjoy!

Shrimp Cocktail:
The shrimps were peeled with the tail on and boiled til they became pink. 

Cocktail sauce:
1/2 cup of ketchup
1/2 cup chili sauce
several drops of tobasco
juice of 1 lemon
2T of worcestershire sauce
2 inch knob of horseradish grounded


Simply combine the ingrediants together and serve cold.


Braised beef ribs in red wine and cider sauce

1kg of beef rib

 Red wine for cooking
Apple cider
6 Garlic cloves
Fresh Rosemary
Beef stock

Mash potatoe
potatoes boiled
chives
sour cream
butter¨
milk
salt

Asparagus lightly cooked in butter


Place oven tray on the stove top and brown ribs on all sides. Add red wine and cider to loosen the brown bits from the tray.  The combination of cider and red wine should be enough to cover half of the ribs.  Add 1 cup beef stock,1 cup of tomato paste,several sprigs og rosemary and chopped garlic.  Set oven at 150C and place tray in the oven for 4-6 hours.  Take the tray out of the oven and place on heated stove top.  Reduce sauce till it thicken and salt and pepper to taste.

The mash was basically boiled potatoes mashed til desired texture.  Add 1 cup of sour cream, melted butter ( I didn't measure and went with my taste), chopped chives, 1 cup of milk, salt and pepper to taste.


And for dessert was a homemade tiramisu:

Lady fingers
3 cups of coffee
2 shots of rum (optional)
sugar to taste

5 egg whites
2 packages (ca 250g) of Mascarpone Cheese
2cups of sugar
Cocoa powder¨shaved dark chocolate


Seperate egg whites and add 2 cup of sugar.  Whisk egg and sugar till the eggs thickens with peaks. Add mascarpone cheese and fold in the egg whites. 

Combine 3 cups of coffee with sugar and rum (optional).  Add sugar to your taste.  Dip lady fingers in coffee mixture and set 1 layer in tray.  Add egg white mascarpone mixture on top.  Continue the process to however high you would like the tiramisu to be.  The final layer of egg and mascarpone, sprinkle cocoa powder on top.  Finish off with shaved dark chocolate.